How to Fix Uneven Chicken Breast Cooking (4 Simple Methods)
If your chicken breast is charred on the outside and raw in the center, or dry at the thin…

If your chicken breast is charred on the outside and raw in the center, or dry at the thin end while still pink at the thick end, you’re dealing with the most common chicken cooking problem. The issue isn’t your technique. It’s the shape of the chicken itself.
Modern chicken breasts are absurdly uneven, with one end twice as thick as the other. Four simple fixes solve this problem permanently.
Disclosure: As an Amazon Associate, this site earns from qualifying purchases. Thank you!
Fix 1: Pound the Chicken to Even Thickness

Place the chicken breast between two sheets of plastic wrap or inside a zip-top bag. Using a meat mallet or the bottom of a heavy pan, pound the thick end until the entire breast is a uniform 3/4-inch thickness. This takes about 30 seconds per breast.
Even-thickness chicken cooks at the same rate across the entire piece, eliminating dry edges and raw centers. It also cooks faster (8 to 10 minutes total in a skillet), which means less time for moisture to escape.
Start with the thickest part of the breast. Place the mallet flat against the meat and hit with controlled, firm strikes. Don’t smash it. You’re redistributing the meat, not tenderizing it.
Work from the center outward, checking thickness as you go. If you don’t own a mallet, a small cast-iron skillet works just as well. The flat bottom provides even pressure.
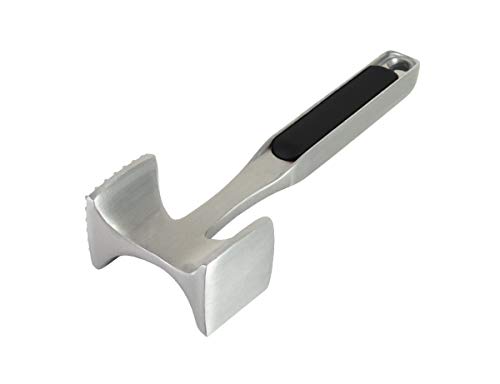
Meat Mallet Tenderizer
Essential tool for evening out chicken breasts quickly and reliably
Pounding also breaks up some of the muscle fibers, which makes the chicken slightly more tender. You’ll notice this most with larger breasts that have dense, thick sections near the bone end.
One mistake: pounding too thin. Below 1/2 inch, chicken cooks so fast you’ll miss the window between done and dry. Stick to 3/4 inch for consistent results.
Fix 2: Butterfly the Breast

For thick breasts that you don’t want to pound, slicing them horizontally creates two thinner, even pieces. Lay the breast flat, place your hand on top, and slice through the middle with a sharp knife. You’ll end up with two cutlets of roughly equal thickness.
Butterflied breasts cook in 3 to 4 minutes per side over medium-high heat. They’re perfect for sandwiches, salads, and quick weeknight meals.
Use a sharp boning knife or chef’s knife. A dull blade will tear the meat instead of slicing cleanly. Keep the knife parallel to the cutting board, not angled. Angle creates uneven cutlets.
Some people butterfly without cutting all the way through, leaving the two halves attached like a book. That works for stuffing and rolling, but for even cooking, separate the halves completely.
Butterflying works best on breasts over 10 ounces. Smaller breasts don’t have enough thickness to split cleanly without ending up with flimsy, fragile cutlets.
If you’re cooking for a crowd, butterfly and pound. You’ll double your portions and halve your cooking time.
Fix 3: Use Two-Zone Cooking

On the grill or in a pan, start the thick end over the higher heat zone and angle the thin end toward the cooler side. This exposes the thicker section to more energy while protecting the thinner part from overcooking.
On a grill, this means placing the thick end directly over the coals while the thin end sits on the cooler side. In a pan, tilt the pan slightly so the thick end sits in the hottest area. Close the lid (grill) or cover the pan to trap heat and cook the top surface evenly.
Two-zone setups work best on charcoal grills where you can bank coals to one side. Gas grills can approximate this by turning off one or two burners and leaving the others on high. The key is a measurable temperature difference between zones. You want 450°F to 500°F on the hot side and 300°F to 350°F on the cool side.
In a skillet, two-zone cooking is harder to control. You’re working with a smaller surface and less temperature variation. Tilt the pan so the thick end sits near the center of the burner and the thin end hangs over the edge. The difference is subtle but noticeable after a few minutes.
This method doesn’t fix the unevenness as completely as pounding or butterflying. It just manages it. You’ll still need to watch the thin end closely to prevent drying.
Fix 4: Start in a Cold Pan
Place seasoned chicken breast skin-side down (or presentation-side down for boneless) in a cold, oiled skillet. Turn the heat to medium. As the pan gradually heats, the chicken cooks more gently and evenly from edge to center.
This method takes about 15 to 18 minutes total (7 to 9 minutes per side) but produces remarkably even doneness throughout. The slower heat buildup gives the thick center time to cook through before the surface dries out.
Cold-pan cooking goes against standard advice, which says to sear meat in a screaming-hot pan. That works for steaks and chops, where you want a hard crust. Chicken is different. The goal is even cooking, not charred browning.
Use a heavy pan. Cast iron or stainless steel holds steady heat as it warms up. Nonstick works but heats unevenly, which defeats the purpose.
Oil the pan before you add the chicken. A thin coating prevents sticking as the chicken releases moisture during the first few minutes. Don’t add more oil halfway through. The chicken will release enough fat to keep things moving.
Flip once. More flipping interrupts the gradual heat transfer. You want a steady build from cold to cooked, not a series of temperature spikes.
Cold-pan chicken develops a pale golden crust, not the deep brown you get from high-heat searing. If that bothers you, finish with 30 seconds per side over high heat after the chicken reaches temp. You’ll get color without sacrificing evenness.
The Real Solution: Buy a Thermometer
Regardless of which fix you use, an instant-read thermometer confirms doneness without guesswork. Insert it into the thickest part and pull the chicken at 160°F. It’ll coast up to 165°F while resting.

Instant Read Meat Thermometer
Takes the guesswork out of chicken doneness and prevents overcooking
ThermoPop, Thermapen, and Lavatools Javelin are solid choices. Cheap dial thermometers are slow and inaccurate. Skip them.
Insert the probe horizontally through the side of the breast, not straight down from the top. This ensures you’re reading the thickest part, not a thinner section near the surface. If you hit bone, pull back slightly. Bone conducts heat differently than meat and will throw off the reading.
Check multiple spots if you’re cooking more than one breast. Oven hot spots and varying breast sizes mean one piece might be done while another needs two more minutes.
Don’t rely on timing alone. A 10-ounce breast cooks faster than a 12-ounce breast. Pan temperature, starting meat temperature, and altitude all affect cook time. The thermometer eliminates the variables and helps you understand proper chicken cooking times for consistent results.
Why Chicken Shape Matters More Than Heat
Uneven chicken fails because heat moves through meat at a fixed rate. A section that’s twice as thick takes more than twice as long to cook. The thin end hits 165°F in 6 minutes while the thick end is still at 140°F. By the time the thick end reaches temp, the thin end has spent 4 extra minutes overcooking.
The temperature gradient is steep. In an uneven breast, the thin edge might be 180°F while the center is 150°F. That’s the difference between dry, stringy meat and juicy, tender meat. No amount of skill fixes bad geometry.
Pounding, butterflying, or two-zone cooking changes the geometry. The entire breast reaches 165°F within a minute or two of itself. You get consistent doneness and better texture.
When to Use Each Fix
Pound the chicken when you want fast, high-heat cooking. Pounded breasts are perfect for pan-searing, grilling, or breading and frying. The thin, even shape promotes quick browning and short cook times.
Butterfly when you’re meal-prepping or cooking for multiple people. Two cutlets from one breast stretch portions and cook in half the time. Butterflied chicken also marinates faster because there’s more surface area.
Use two-zone cooking when you don’t want to alter the chicken’s shape. Bone-in, skin-on breasts benefit from this method because pounding damages the skin and butterflying is impractical with the bone in.
Start in a cold pan when you’re cooking thick breasts and don’t have time to pound or butterfly. It’s the lowest-effort fix, requiring only patience and a thermometer.
Combine methods for best results. Pound the chicken, then use a cold pan. Or butterfly, then grill over two zones. The fixes aren’t exclusive.
Common Mistakes to Avoid
Why Are Chicken Breasts So Thick Now?
Modern poultry breeding has produced larger, faster-growing chickens. Breasts that weighed 4 to 5 ounces decades ago now regularly weigh 8 to 12 ounces, with uneven thickness that makes cooking more challenging.
Chickens bred for size grow muscle mass quickly, but the muscle doesn’t distribute evenly. The pectoral muscles near the keel bone get thicker while the tapered edges stay relatively thin. This creates the wedge shape that plagues home cooks.
Some stores sell “thin-sliced” or “cutlet-style” breasts that have been pre-pounded or pre-butterflied. They cost more per pound but save prep time.
Should I Buy Thin-Sliced Chicken Breasts Instead?
Pre-sliced thin chicken breasts solve the evenness problem but cost more per pound. Buying standard breasts and pounding or butterflying them yourself saves money and gives you more control over the final thickness.
Pre-sliced chicken is also thinner than ideal. Most store cutlets measure 1/4 to 1/2 inch, which cooks in under 5 minutes. That’s fast, but the margin for error is razor-thin. Overcook by 60 seconds and the chicken dries out.
If you value convenience over cost, pre-sliced works. If you want control and savings, buy whole breasts and prep them yourself.
Does Covering the Pan Help?
Yes. A lid traps steam and heat, cooking the top surface of the chicken at the same time